
Build tools are programs or libraries that automate the creation of executable applications from source code. Building incorporates compiling, linking and packaging the code into a usable or executable form. Basically build automation is the act of scripting or automating a wide variety of tasks that software developers do in their day-to-day activities like:
- Downloading dependencies.
- Compiling source code into binary code.
- Packaging that binary code.
- Running tests.
- Deployment to production systems.
There are various build tools available based on programming language or framework. For example, NAnt is a build tool for .NET Framework, MSBuild is a build tool for C# and Ant, Maven and Gradle are build tools for Java. In this article, I would like to share about Gradle, Gradle project setup and involvement of Gradle in Automation.
What is Gradle?
Gradle is an opensource build and automation tool for java based projects. Using Gradle, we can reduce project development time and increase productivity. Gradle is available as a plugin along with Eclipse, IntelliJ IDEA. Gradle is highly customizable, fast and powerful. The main motto of Gradle is “Make the impossible possible, make the possible easy, and make the easy elegant”.
Gradle does not use XML. Instead, it had its own DSL based on Groovy (one of JVM languages). As a result, Gradle build scripts tend to be much shorter and clearer than those written for Ant or Maven. Initially, Gradle used Apache Ivy for its dependency management. Later own it moved to its own native dependency resolution engine.
Advantage of Gradle over And and Maven
Gradle will provide the following advantages compared to ant and maven. Nowadays all the projects are using Gradle as build tool,
- Very easy to use gradle tool and implement custom logic in the project.
- Like Maven, Gradle is also an expressive, declarative, and maintainable build tool.
- Like Maven, Gradle also supports dependency management.
- Gradle provides standard project layout and lifecycle, but it’s full flexibility. We have the option to fully configure the defaults. This is where it’s better than maven.
- Gradle provides very scalable and high-performance builds.
- Gradle supports the project structure that consists of more than one project to build deliverable.
- Easy to integrate existing ant/maven project with Gradle.
- Easy to migrate from existing ant/maven project to Gradle.
Gradle combines most of the popular build tool plus points into a single build tool. In simple terminology, Gradle is built by taking all the good things from Ant, Maven, Ivy and Gant.
Involvement of Gradle in Automation
As we discussed above Gradle projects are flexible and fast to start building new logic. Like Maven projects, we can create Gradle projects for automation and also we can configure Gradle projects in Continuous Integration environments. The following are the important steps to setup and execute Gradle project using Eclipse IDE for Selenium automation,
Pre-requisites
- JDK 8 and above must be installed.
- Latest Eclipse should be installed.
- Install TestNG plugin (https://dl.bintray.com/testng-team/testng-eclipse-release/7.0.0/) in Eclipse.
- Download Gradle binary from https://gradle.org/releases/. Extract the downloaded Gradle binary, then set GRADLE_HOME in environment variable and %GRADLE_HOME%\bin in
Step 1: Open Eclipse IDE, go to File menu > New > select Other option.
Step 2: Select Gradle Project inside Gradle folder in Select a wizard window. Click on Next button.
Step 3: Observe that Welcome page will appear. Click on Next button.
Step 4: Enter project name say SeleniumGradleAutomation and click on Finish button.
Step 5: Wait for few seconds and following project structure will be created in Project Explorer of Eclipse IDE,

The overall Gradle project structure same as Maven project structure. In Maven project, we know that pom.xml used to set layout configuration of dependencies, build, and plugins but in case of Gradle project the dependencies, plugins, and tasks are configuring in the build.gradle file. The settings.gradle is used to specify which projects to include in your build, by default rootProject.name should be your gradle project name say SeleniumGradleAutomation.
Step 6: Create a java class in src/test/java section and implement sample selenium automation script using TestNG annotations. Also, create testing.xml file in the project structure.
Step 7: Configure build.gradle file
- By default the gradle has plugins, repositories and dependencies sections. For execution purpose we can add different task sections.
- plugins: this section applying plugins to the project which allows the plugin to extend the project’s capabilities. By default you can see id ‘java-library’.
- repositories: this section using for resolve dependencies. You can declare any Maven/Ivy/file repository here. By default you can see jcenter().
- dependencies: this section helps to keep all the required dependent libraries which useful for the development. Declare your dependencies in this section. Refer: https://search.maven.org/ to get the gradle dependencies. Remove all the by default dependencies and add Selenium and TestNG dependencies for web automation and execution.
- Custom tasks: dependence of your purpose, the tasks implementation may vary. Here, the intention is to run the automation test cases. So that I have created gradle task called test, within the test task implemented useTestNG() to launch xml file. If you have multiple suite files then need to use suites attribute to define various suite files. In the custom task section, we can specify the report listeners, the report directories and groups to be included or excluded for execution.
Below is the example code snippet of build.gradle file,
plugins {
// Apply the java-library plugin to add support for Java Library
id ‘java-library’
}repositories {
// Use jcenter for resolving dependencies.
// You can declare any Maven/Ivy/file repository here.
jcenter()
}dependencies {
// Declare your dependencies. Refer: https://search.maven.org/ to get the gradle dependency
implementation ‘org.testng:testng:7.1.0’
implementation ‘org.seleniumhq.selenium:selenium-java:3.141.59’
}test { //this is the gradle task to be executed
useTestNG() { //Tells Gradle to use TestNG
suites ‘testng.xml’ //location of your testng.xml
}
}
An alternative way of implementing testing.xml within task as follows:
task testExecution(type: Test){
useTestNG(){
suites ‘testng.xml’
}
}
NOTE: once you update the details in build.gradle file, you need to refresh the gradle project to get all the configuration into your project. For that, right-click on the project then go to Gradle and select Refresh Gradle Project option.
How to Execute the Automation Project in Gradle?
You can execute the automation projects in Gradle in three ways:
- Using testing.xml: this is the easiest way, just right click on the xml file, then go to Run As and select TestNG Suite option.
- Using Gradle Task within Eclipse: in this example, we already configured test task and testExecution task, you need to configure either of the task in Run Configurations of the project. For that, right-click on the project the go to Run As, select Run Configurations Select Gradle Task, add new launch configuration under Gradle Task, select the newly added configuration, go to Gradle Tasks tab then click Add button and add your task which already defined in the build.gradle file says test or testExecution. Finally, click on Run button to start the automation execution.
- Using CLI: this is the non-GUI mode means we are not using any IDE to trigger the automation execution. In this case, we are using the command-line interface. You need to point to the project directory in the command line interface. After that, you can use following commands to trigger the automation execution,
-
- gradle clean test
OR
-
- gradle clean testExecution
Most of the time the automation engineers who deal with IDE are using the first way of automation execution. In larger CI/CD executions, the engineers are using the third way of automation execution.
TestNG Report and Gradle Report
Gradle cannot able to generate TestNG report implicitly. If we execute testng.xml file then test-output folder with emailable-report will generate. If we execute using gradle task then we need to do additional configuration in task to generate the emailable-report. For this configuration, we need two attributes in tasks, useDefaultListeners, and outputDirectory. To generate the emailable report need to set useDefaultListeners as true and set then directory path to generate the report. Below are the configurations,
test { //this is the gradle task to be executed
useTestNG() { //Tells Gradle to use TestNG
suites ‘testng.xml’ //location of your testng.xml
useDefaultListeners=true
outputDirectory=file(“$projectDir/TestNGReport”)
}
}OR
task testExecution(type: Test){
useTestNG(){
suites ‘testng.xml’
useDefaultListeners=true
outputDirectory=file(“$projectDir/TestNGReport”)
}
}
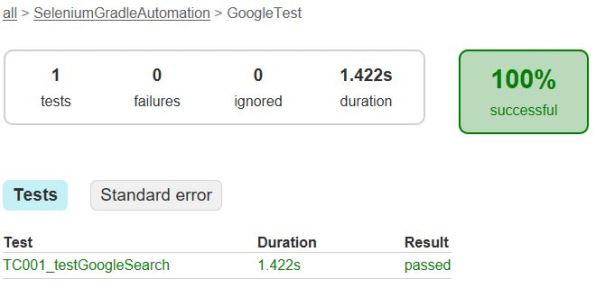
Alternatively, Gradle provides a good feature to generate the HTML report for your automation execution. This is a very simple one-line configuration in your task section in build.gradle file as below:
test { //this is the gradle task to be executed
useTestNG() { //Tells Gradle to use TestNG
suites ‘testng.xml’ //location of your testng.xml
reports.html.setDestination(file(“$projectDir/GradleReport”))
}
}OR
task testExecution(type: Test){
useTestNG(){
suites ‘testng.xml’
reports.html.setDestination(file(“$projectDir/GradleReport”))
}
}
Below is the sample screenshot of Gradle report:
Gradle with Continuous Integration Environment
Like Maven or Ant build tools, Gradle also supports Continuous Integration or Continuous Delivery environments. The configuration perceptive there are some changes in Gradle. Here, I would like to share the Gradle configuration on GitLab and Jenkins.
Gradle with GitLab
You need to create a repository in GitLab and commit your Gradle project into that repository. For CI/CD pipeline execution, you need to create .gitlab-ci.yml. Below is the basic configuration in .gitlab-ci.yml:
image: gradle:latest
before_script:
################################################################################################
# Install Xvfb (X virtual framebuffer) packages. #
# Xvfb (X virtual framebuffer) is an in-memory display server for a UNIX-like operating system #
# It implements the X11 display server protocol without any display. #
################################################################################################
– apt-get update
– apt-get -y install gnupg
– apt-get install -y unzip xvfb libxi6 libgconf-2-4##########################
# Install Java on system #
##########################
– apt-get install -y default-jdk##################################################
# Install Latest Google chrome package on system #
##################################################
– curl -sS -o – https://dl-ssl.google.com/linux/linux_signing_key.pub | apt-key add
– echo “deb [arch=amd64] http://dl.google.com/linux/chrome/deb/ stable main” >> /etc/apt/sources.list.d/google-chrome.list
– apt-get -y update
– apt-get -y install google-chrome-stablestages:
– testtest:
stage: test
script:
– chmod a+x /builds/gitlabusername/automationreponame/chromedriver #If you not given the permission then you may face “java.lang.IllegalStateException: The driver is not executable” error.
– gradle clean #Compile your scripts
– gradle testExecution #Run your scripts
Gradle with Jenkins
You need to create a repository in Git or Bitbucket or any SVN and commit your Gradle project into that repository. In Jenkins, you need to follow below steps:
Step 1: start the Jenkins server.
Step 2: Once the Jenkins server ready, you need to access Global Tool Configuration – set Java path and Gradle path.
Step 3: Create Freestyle Project, go to Source Code Management section and configure the gradle project repository path.
Step 4: Go to Build section, click on Add build step and select Invoke Gradle Script. Select the configured Gradle version and specify tasks like clean testExecution (testExecution is the task which already defined in the build.gradle file). Finally, click on Apply and Save.
Step 5: Click on Build Now to begin your automation execution.
Conclusion
In recent years, Gradle is one of the powerful build tools compare to other build tools. Gradle support lot many features for all the developers based on their requirement. In this article, I have pointed the Gradle in terms of Automation. You can refer to each and every section in the article to proceed with your Gradle – Automation implementations.
make it perfect!

Leave a comment